How to Add Webflow Smooth Scroll: Create Seamless Scrolling

Do you want to create a seamless scrolling experience for your website visitors? If so, then you need to…

How to Add Webflow Smooth Scroll: Create Seamless Scrolling

Table of contents:

See more

Do you want to create a seamless scrolling experience for your website visitors? If so, then you need to add Webflow smooth scroll. It is an easy process that only takes a few minutes to set up. In this article, we will show you How to add Webflow smooth scroll.

What is Webflow Smooth Scroll?

Webflow Smooth Scroll is a game-changing feature for web designers that enhances user experience. This innovative feature replaces choppy, rough scrolling with a more fluid and seamless scrolling experience. With it, users can easily navigate long web pages with ease and without getting annoyed by incessant jumps and pauses.

The result is an improved web experience that engages and delights users, making it easier for them to find the information they need. If you haven’t tried Webflow Smooth Scroll yet, you are missing out on a truly game-changing user experience in Webflow projects.

Benefits of Adding Webflow Smooth Scroll

Webflow smooth scroll is a feature that allows users to create a smooth scrolling effect on their websites. This means that instead of jumping from one section of a page to another, the content flows seamlessly and gradually. Here are some benefits of adding Webflow smooth scroll to your website:

Better user experience: Webflow smooth scroll can make navigating a website easier and more enjoyable. Users may easily locate what they’re looking for without getting lost or upset, thanks to smooth scrolling between sections and pages.

Enhances aesthetic appeal: Little scrolling animations can give a website’s design a sense of class and sophistication. It may also give the Webflow website a more contemporary and modern appearance.

Improves engagement: Users are more likely to stay on your Webflow website longer when scrolling is done smoothly. With higher involvement, there may be fewer bounces and more conversions.

Improved accessibility: Smooth scrolling can improve accessibility by lowering the risk of motion sickness and other unfavorable side effects that might result from jerky or abrupt scrolling. It is especially true for users with disabilities.

Mobile-friendly: Smooth scrolling can improve the user experience for mobile users by reducing the need to zoom in and out or scroll irregularly, which is important as more people use the internet from their mobile devices.

How to Add Webflow Smooth Scroll

To add a smooth scroll to your Webflow website, you need to follow a few simple steps.

Step-1: Add the custom code to your page settings

The first step is to insert the custom code into your page settings. You can do this by accessing the page settings and adding the script to the before </body> section of your code. You can find the scroll script online or create your own with technical expertise. Here is a demo of the scroll script.
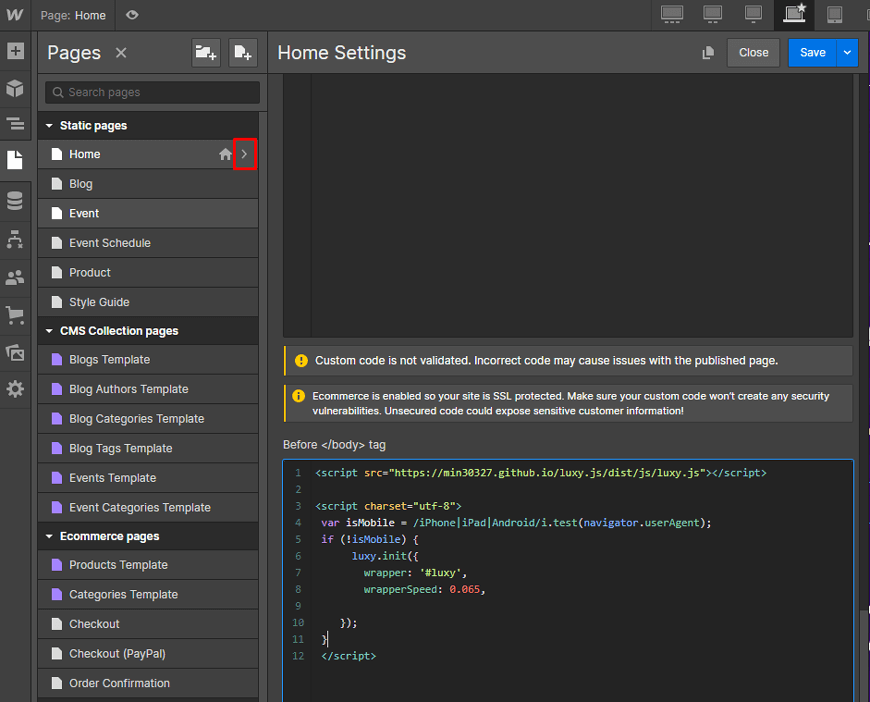
Add the custom code to your page settings

Step-2: Create a div block that wraps all of your page’s components

The next step is to add a Div Block to your page that will wrap up all the elements on your page. This is important because it ensures that the smooth scroll effect will apply to all the elements on the page. You can add the div-block by selecting the “Add Element” option and choosing the “div” option. You can then position the div block where you want it on the page.
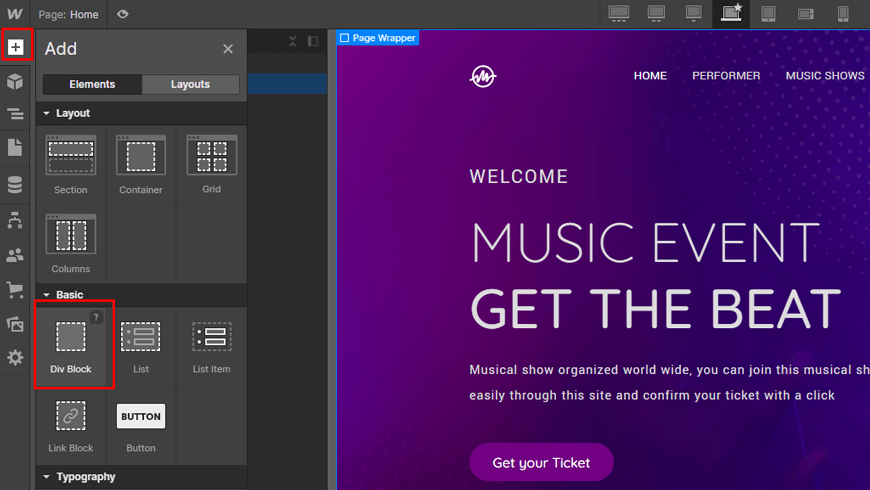
Create a div block that wraps all of your page's components
Create a div block that wraps all of your page’s components

Step-3: Check that the div-block has the #ID ‘luxy’

After adding the div-block, you need to assign the #ID ‘luxy‘ to it. This is essential because it tells Webflow that the elements inside the div block should have the smooth scroll effect applied to them. You can assign the #ID by selecting the div block and going to the “settings” panel. From there, you can enter the #ID ‘luxy’ in the appropriate field.
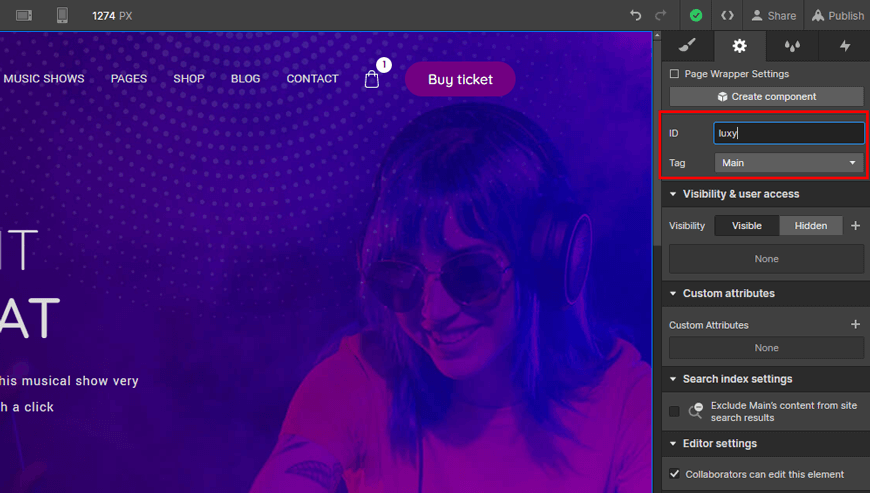
Check that the div-block has the ID 'luxy'
Check that the div-block has the #ID ‘luxy’

Once you have completed these steps, you should test your Webflow website to ensure the smooth scroll effect works correctly. If everything is working correctly, you should be able to navigate smoothly between sections on your page, which can improve the user experience and engagement on your website.

100+ Top-notch Webflow Templates

Take your website design to the next level with our stunning collection of Webflow templates.

Frequently Asked Questions

How can I make Webflow’s scrolling slower?

Setting the value of the data-scroll-time attribute will slow down the scroll motion in your Webflow site. You can set a scroll speed of one as quickly as standard and a scroll speed of zero to scroll directly to the element.

How can I create a horizontal scroll?

You must click and drag a horizontal scroll bar to create a horizontal scroll. Then, to make it show on your page, slide sideways on the touchscreen or use the left and right arrow buttons.

What are the benefits of using smooth scroll in Webflow?

Smooth scrolling in Webflow can create a more visually appealing and user-friendly experience for your visitors. In addition, it can make navigating between sections of your website feel more fluid and professional.

Get Premium Webflow Services from Brandbes

Getting your business online can be daunting, but with Brandbes’ exclusive Webflow services, you can achieve your goals without the stress. They understand that every business is unique and offer premium template designs and development services tailored to your specific requirements.

Brandbes Webflow Template Design and Development Agency

As experts in all things Webflow projects, their team of professionals has helped tens of thousands of clients achieve their online business objectives and grow their businesses. With a wide variety of simple-to-use templates to choose from, you can be assured that every step of the process will be seamless.

Additionally, you’ll receive support from knowledgeable and committed specialists of the Webflow platform, making website or online shop creation easier than ever. Let Brandbes help you take your business to the next level!

Conclusion

In conclusion, the Webflow Smooth Scroll motion is an absolute game-changer. The seamless transition between sections on a page creates a modern and sophisticated browsing experience that keeps visitors engaged.

Furthermore, by eliminating the abrupt and jarring scrolling that can occur on some sites, Webflow has crafted a tool that enhances the user’s journey. In addition to the functional advantages, this feature also adds a touch of elegance to any website design.

100+ Top-notch Webflow Templates

Take your website design to the next level with our stunning collection of Webflow templates.

Table of contents:

See more

Do you want to create a seamless scrolling experience for your website visitors? If so, then you need to add Webflow smooth scroll. It is an easy process that only takes a few minutes to set up. In this article, we will show you How to add Webflow smooth scroll.

What is Webflow Smooth Scroll?

Webflow Smooth Scroll is a game-changing feature for web designers that enhances user experience. This innovative feature replaces choppy, rough scrolling with a more fluid and seamless scrolling experience. With it, users can easily navigate long web pages with ease and without getting annoyed by incessant jumps and pauses.

The result is an improved web experience that engages and delights users, making it easier for them to find the information they need. If you haven’t tried Webflow Smooth Scroll yet, you are missing out on a truly game-changing user experience in Webflow projects.

Benefits of Adding Webflow Smooth Scroll

Webflow smooth scroll is a feature that allows users to create a smooth scrolling effect on their websites. This means that instead of jumping from one section of a page to another, the content flows seamlessly and gradually. Here are some benefits of adding Webflow smooth scroll to your website:

Better user experience: Webflow smooth scroll can make navigating a website easier and more enjoyable. Users may easily locate what they’re looking for without getting lost or upset, thanks to smooth scrolling between sections and pages.

Enhances aesthetic appeal: Little scrolling animations can give a website’s design a sense of class and sophistication. It may also give the Webflow website a more contemporary and modern appearance.

Improves engagement: Users are more likely to stay on your Webflow website longer when scrolling is done smoothly. With higher involvement, there may be fewer bounces and more conversions.

Improved accessibility: Smooth scrolling can improve accessibility by lowering the risk of motion sickness and other unfavorable side effects that might result from jerky or abrupt scrolling. It is especially true for users with disabilities.

Mobile-friendly: Smooth scrolling can improve the user experience for mobile users by reducing the need to zoom in and out or scroll irregularly, which is important as more people use the internet from their mobile devices.

How to Add Webflow Smooth Scroll

To add a smooth scroll to your Webflow website, you need to follow a few simple steps.

Step-1: Add the custom code to your page settings

The first step is to insert the custom code into your page settings. You can do this by accessing the page settings and adding the script to the before </body> section of your code. You can find the scroll script online or create your own with technical expertise. Here is a demo of the scroll script.

Add the custom code to your page settings

Step-2: Create a div block that wraps all of your page’s components

The next step is to add a Div Block to your page that will wrap up all the elements on your page. This is important because it ensures that the smooth scroll effect will apply to all the elements on the page. You can add the div-block by selecting the “Add Element” option and choosing the “div” option. You can then position the div block where you want it on the page.

Create a div block that wraps all of your page's components
Create a div block that wraps all of your page’s components

Step-3: Check that the div-block has the #ID ‘luxy’

After adding the div-block, you need to assign the #ID ‘luxy‘ to it. This is essential because it tells Webflow that the elements inside the div block should have the smooth scroll effect applied to them. You can assign the #ID by selecting the div block and going to the “settings” panel. From there, you can enter the #ID ‘luxy’ in the appropriate field.

Check that the div-block has the ID 'luxy'
Check that the div-block has the #ID ‘luxy’

Once you have completed these steps, you should test your Webflow website to ensure the smooth scroll effect works correctly. If everything is working correctly, you should be able to navigate smoothly between sections on your page, which can improve the user experience and engagement on your website.

100+ Top-notch Webflow Templates

Take your website design to the next level with our stunning collection of Webflow templates.

Frequently Asked Questions

How can I make Webflow’s scrolling slower?

Setting the value of the data-scroll-time attribute will slow down the scroll motion in your Webflow site. You can set a scroll speed of one as quickly as standard and a scroll speed of zero to scroll directly to the element.

How can I create a horizontal scroll?

You must click and drag a horizontal scroll bar to create a horizontal scroll. Then, to make it show on your page, slide sideways on the touchscreen or use the left and right arrow buttons.

What are the benefits of using smooth scroll in Webflow?

Smooth scrolling in Webflow can create a more visually appealing and user-friendly experience for your visitors. In addition, it can make navigating between sections of your website feel more fluid and professional.

Get Premium Webflow Services from Brandbes

Getting your business online can be daunting, but with Brandbes’ exclusive Webflow services, you can achieve your goals without the stress. They understand that every business is unique and offer premium template designs and development services tailored to your specific requirements.

Brandbes Webflow Template Design and Development Agency

As experts in all things Webflow projects, their team of professionals has helped tens of thousands of clients achieve their online business objectives and grow their businesses. With a wide variety of simple-to-use templates to choose from, you can be assured that every step of the process will be seamless.

Additionally, you’ll receive support from knowledgeable and committed specialists of the Webflow platform, making website or online shop creation easier than ever. Let Brandbes help you take your business to the next level!

Conclusion

In conclusion, the Webflow Smooth Scroll motion is an absolute game-changer. The seamless transition between sections on a page creates a modern and sophisticated browsing experience that keeps visitors engaged.

Furthermore, by eliminating the abrupt and jarring scrolling that can occur on some sites, Webflow has crafted a tool that enhances the user’s journey. In addition to the functional advantages, this feature also adds a touch of elegance to any website design.

Table of contents:

See more

Do you want to create a seamless scrolling experience for your website visitors? If so, then you need to add Webflow smooth scroll. It is an easy process that only takes a few minutes to set up. In this article, we will show you How to add Webflow smooth scroll.

What is Webflow Smooth Scroll?

Webflow Smooth Scroll is a game-changing feature for web designers that enhances user experience. This innovative feature replaces choppy, rough scrolling with a more fluid and seamless scrolling experience. With it, users can easily navigate long web pages with ease and without getting annoyed by incessant jumps and pauses.

The result is an improved web experience that engages and delights users, making it easier for them to find the information they need. If you haven’t tried Webflow Smooth Scroll yet, you are missing out on a truly game-changing user experience in Webflow projects.

Benefits of Adding Webflow Smooth Scroll

Webflow smooth scroll is a feature that allows users to create a smooth scrolling effect on their websites. This means that instead of jumping from one section of a page to another, the content flows seamlessly and gradually. Here are some benefits of adding Webflow smooth scroll to your website:

Better user experience: Webflow smooth scroll can make navigating a website easier and more enjoyable. Users may easily locate what they’re looking for without getting lost or upset, thanks to smooth scrolling between sections and pages.

Enhances aesthetic appeal: Little scrolling animations can give a website’s design a sense of class and sophistication. It may also give the Webflow website a more contemporary and modern appearance.

Improves engagement: Users are more likely to stay on your Webflow website longer when scrolling is done smoothly. With higher involvement, there may be fewer bounces and more conversions.

Improved accessibility: Smooth scrolling can improve accessibility by lowering the risk of motion sickness and other unfavorable side effects that might result from jerky or abrupt scrolling. It is especially true for users with disabilities.

Mobile-friendly: Smooth scrolling can improve the user experience for mobile users by reducing the need to zoom in and out or scroll irregularly, which is important as more people use the internet from their mobile devices.

How to Add Webflow Smooth Scroll

To add a smooth scroll to your Webflow website, you need to follow a few simple steps.

Step-1: Add the custom code to your page settings

The first step is to insert the custom code into your page settings. You can do this by accessing the page settings and adding the script to the before </body> section of your code. You can find the scroll script online or create your own with technical expertise. Here is a demo of the scroll script.

Add the custom code to your page settings

Step-2: Create a div block that wraps all of your page’s components

The next step is to add a Div Block to your page that will wrap up all the elements on your page. This is important because it ensures that the smooth scroll effect will apply to all the elements on the page. You can add the div-block by selecting the “Add Element” option and choosing the “div” option. You can then position the div block where you want it on the page.

Create a div block that wraps all of your page's components
Create a div block that wraps all of your page’s components

Step-3: Check that the div-block has the #ID ‘luxy’

After adding the div-block, you need to assign the #ID ‘luxy‘ to it. This is essential because it tells Webflow that the elements inside the div block should have the smooth scroll effect applied to them. You can assign the #ID by selecting the div block and going to the “settings” panel. From there, you can enter the #ID ‘luxy’ in the appropriate field.

Check that the div-block has the ID 'luxy'
Check that the div-block has the #ID ‘luxy’

Once you have completed these steps, you should test your Webflow website to ensure the smooth scroll effect works correctly. If everything is working correctly, you should be able to navigate smoothly between sections on your page, which can improve the user experience and engagement on your website.

Latest Post

What Is Webflow Used For? Top 10 Features That Make It Stand Out
Webflow

What Is Webflow Used For? Top 10 Features That Make It Stand Out

Discover what Webflow is used for and explore its top 10 standout features that revolutionize web design and enhance user experien

November 14, 2024
Why Webflow Is Better Than WordPress for Modern Web Design: Top 10 Reasons
Webflow

Why Webflow Is Better Than WordPress for Modern Web Design: Top 10 Reasons

Webflow outshines WordPress with seamless built-in hosting, faster performance, and integrated SEO tools

November 14, 2024
Webflow Workspace vs Site Plan: Which One Should You Choose?
Webflow

Webflow Workspace vs Site Plan: Which One Should You Choose?

Discover the key differences between Webflow Workspace and Site Plans to determine which plan best suits your web design needs,

November 14, 2024