How to Create Flows Using WebFlow Logic: A Comprehensive Guide

Webflow is a web design platform that allows you to design and create your website without coding experience

How to Create Flows Using WebFlow Logic: A Comprehensive Guide

Table of contents:

See more

Webflow is a web design platform that allows you to design and create your website without coding experience. It also offers a unique tool - Webflow Logic, which will enable you to create flows that can handle complex interactions. Whether you want to trigger a popup or send an email, Webflow Logic can help you achieve it.

When creating flows, it's important to remember that you should lead the user towards your goal, whether filling out a webflow form or completing a purchase. In this blog, we'll explore the ins and outs of how to create flows using WebFlow logic to help you create stunning flows that engage and delight your audience.

100+ Top-notch Webflow Templates

Take your website design to the next level with our stunning collection of Webflow templates. making them more manageable

What is WebFlow Logic?

WebFlow Logic empowers users to build and execute automated workflows, referred to as "flows," seamlessly within the Webflow Designer. These dynamic processes enable the collection and routing of sales leads, facilitate customer connections, and effectively manage site content. 

This innovative tool centralizes diverse functionalities, providing a comprehensive solution for directly streamlining tasks such as lead management, customer engagement, and content administration within Webflow.

The importance of WebFlow Logic in creating user flows

The importance of incorporating conditional logic into user flows includes:

User Experience (UX): An easy-to-use and intuitive user experience is facilitated by logic. It guarantees that users can go around the program or website in a predictable and logical manner.

Task Completion: By creating coherent user flows, you may lead users through the procedures required to finish particular activities or actions. Due to the decreased friction, users can accomplish their objectives more easily.

Efficiency: Logical user flows contribute to the efficiency of the user interaction. Users should be able to move from one section to another with minimal confusion, reducing their time to accomplish their tasks.

Error Prevention: Well-designed user flows can help prevent errors or misunderstandings by guiding users through a process in a clear and structured way. This integration platform can reduce the likelihood of users making mistakes.

Consistency: Conditional logic in user flows ensures consistency across different sections of the website or application. Consistent interactions and navigation patterns facilitate users' development of a mental model of the system.

Engagement: Logical and well-designed user flows contribute to user engagement. Users are likelier to find what they're looking for when browsing information or features on a website or application.

Accessing Webflow Logic

Here are the step-by-step instructions to access the Webflow Logic dashboard:

  1. Open your Webflow project in the Webflow CMS Designer.
  2. In the left toolbar, look for the Logic icon. It typically appears as an icon representing logic or workflows.
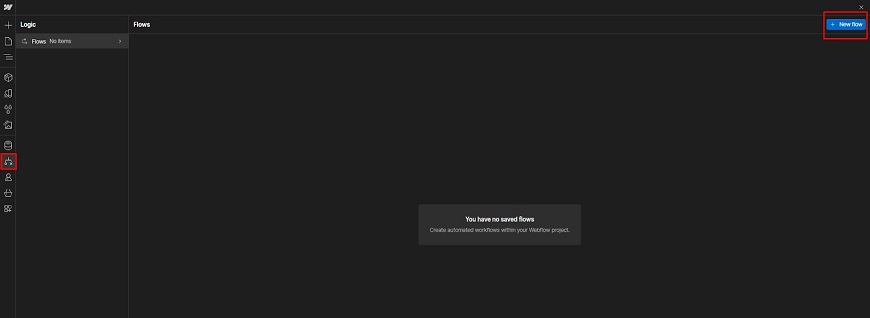
  3. Click on the Logic icon. This action will open the Logic panel on your screen.
  4. Within the Logic panel, you will find various tabs. Click on the "New flow" tab.
  5. In the Flows tab, you can view high-level information about your flows. This information may include the flow name, description, Flow ID, and other relevant details.
  6. To create, manage, or test flows, use the Flow editor, which is accessible from the Flows tab.

How to Create Flows Using WebFlow Logic - An Easy Guide

WebFlow Logic allows you to design dynamic and interactive experiences on your website. Follow this simple guide on how to create flows using WebFlow logic to create flows effortlessly:

Creating a new flow

Creating flows using WebFlow Logic involves a step-by-step process:

Initiate Flow Construction:
Initiate Flow Construction

Start by creating and constructing flows, which are conditional logic sequences composed of triggers, actions, and conditions. Access the Flow editor by navigating to the Logic panel > Flows tab and selecting "New flow." This opens the Flow editor, where you can build the logic for your flows.

Configure Flow Settings:

Configure Flow Settings

Within the Flow editor, you'll find Flow settings. Provide your new flow with a name and description to clearly define its purpose and distinguish it from other flows. Additionally, note the Flow ID, which is essential for troubleshooting. In an example scenario, the flow name might be "Route contact form submissions" with a description like "Direct contact form submissions to the appropriate mailbox."

Construct the Flow:
Construct the Flow

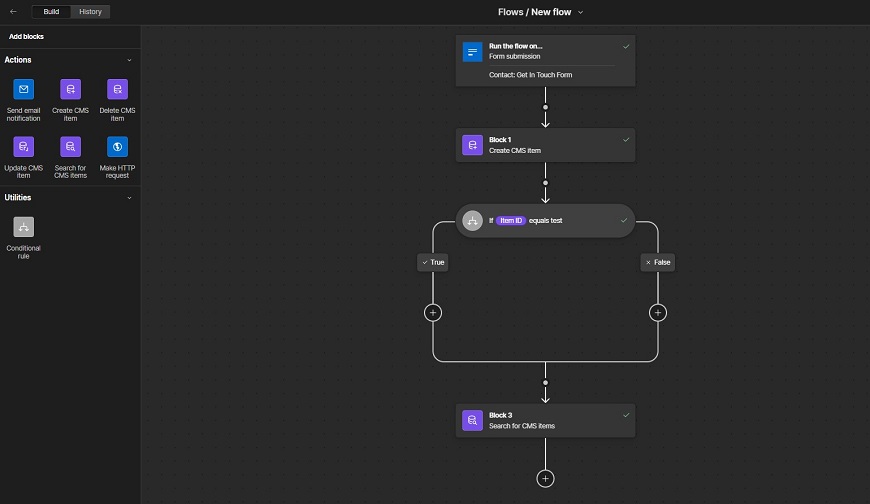
Begin constructing your flow by selecting a trigger. Drag and drop actions and utilities onto the Flow editor canvas, connecting them to the appropriate points. These webflow integration connection points signify where blocks can be inserted, representing triggers, actions, or conditions. By carefully arranging these elements, you can design a logical sequence that guides the flow's behavior according to your specified triggers and conditions.

Constructing a flow with triggers, actions, and conditions

Step 1: Triggers

Initiate your Logic flow by incorporating a trigger, the catalyst for your automated sequence. This trigger could be an event within your website, such as form submissions, or an external occurrence signaled through a webhook. 

Select a trigger and configure its settings accordingly, providing a distinctive name for clarity. 

Note that each flow can accommodate only one trigger, and you have the flexibility to modify or remove it as needed. Examine the Trigger settings to see the output data that is shared with the flow's next blocks.

Step 2: Form Submission

If your trigger revolves around Form submission, add a form to your website. Link this Form to your flow trigger so that the flow activates when visitors submit the Form. Remember that a form can only serve as a trigger for one Logic flow. 

Navigate through the Flow editor to select the specific Form, or utilize the Designer canvas to add a Form submission trigger. 

You can easily disconnect a form from the trigger by accessing the Flow editor and navigating to the Trigger settings. Optionally, spam filtering can be implemented to sift through flow form submissions for potential spam.

Step 3: Actions

Action blocks within your Logic flow dictate the sequence of events you want to occur. These blocks can accept input data, execute logical operations, and generate output data for subsequent blocks. 

The available action blocks include sending email notifications, creating, updating, or deleting CMS items, searching for CMS items, making HTTP requests, and managing user accounts. 

Analyze the output data of these action blocks in the Block settings to understand the information shared with subsequent elements in the flow. Tailor your actions to streamline and automate your desired workflow effectively.

Testing a flow

After ensuring the right configuration and smooth execution of your flow, it's essential to conduct testing before publishing. This process also aids in identifying and resolving any potential issues within the flow. Follow these steps to test your flow:

  1. Open the Flow editor and navigate to the upper right corner.
  2. Click on "Test flow" to initiate the testing process. This action will open a modal menu window.
  3. In the modal menu, input sample data relevant to the connected trigger of your flow. For instance, if you have a Form submission trigger, fill out a sample flow form.
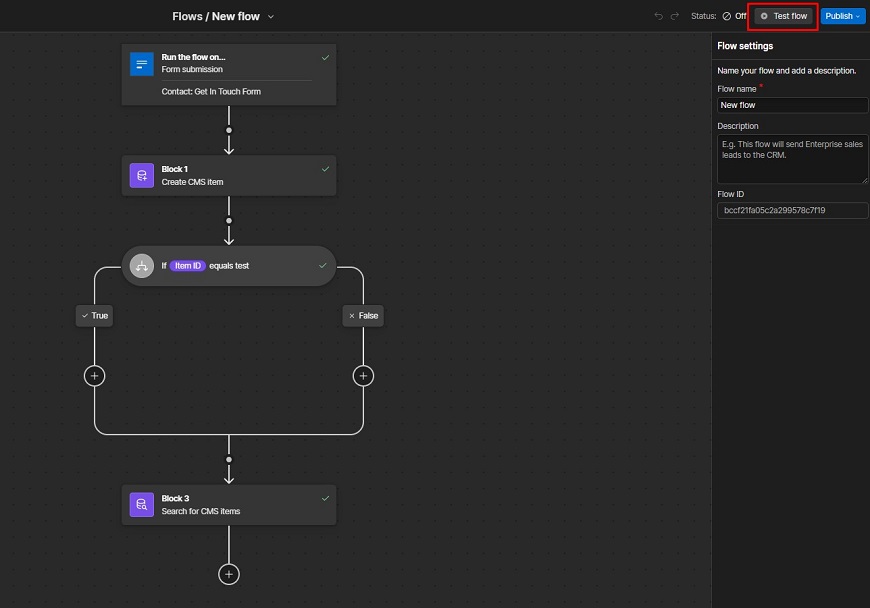
Testing a flow

To independently test the Make HTTP request blocks, follow either of these options:

  1. Click on the Right button on the Make HTTP request block and choose "Test this action."
  2. Select the Make HTTP request block on the canvas, then click "Run test" within Block settings. It will open a modal menu where you can input sample data for the values configured in Block settings.
  3. After entering the sample data, click "Run test" to execute a test of the specific block. These test results will be displayed in the modal menu window.
  4. Review the results and, if satisfied, click "Apply data" to integrate the test response into the rest of your flow.


Publishing a flow

The procedure for publishing your flow varies based on the trigger used to initiate it, such as flow form submission or Incoming webhook. If your flows operate independently of site interactions, you can handle their publishing separately from site publishing.

Publishing a Form Submission Flow:
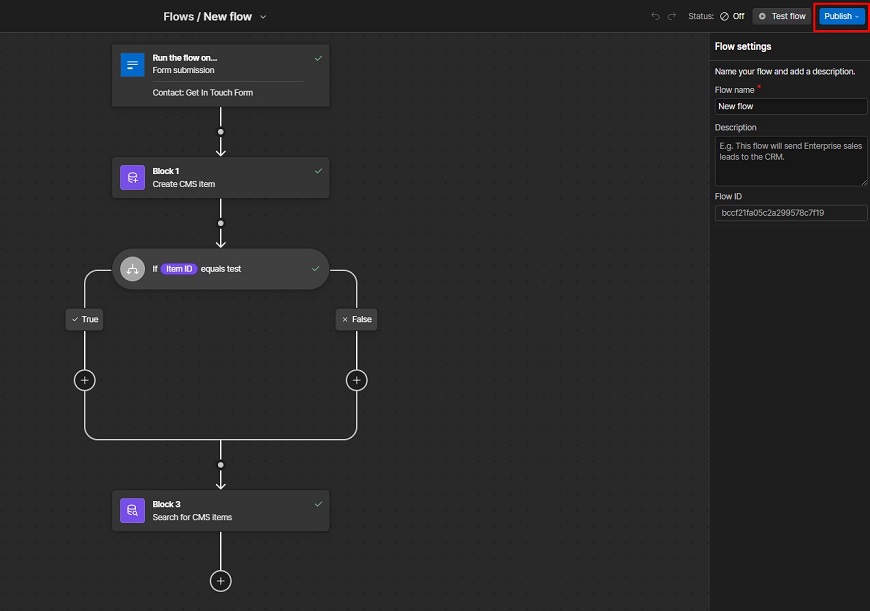
Publishing a Form Submission Flow
  1. Choose the flow form that starts your flow from the Form menu in the Flow editor.
  2. To publish your flow on the next full site update, click "Publish" and then select "Stage flow for publish."
  3. Alternatively, for an immediate removal from your live site, click "Publish" and then choose "Unpublish Flow."
  4. Note: If any flows have unresolved issues, an alert modal will appear during site publishing. Resolve issues before proceeding, as unresolved flows will be disabled.

Publishing an Incoming Webhook Flow:

Flows using Incoming webhook triggers may not require site publishing. Two options for publishing Incoming webhook flows:

  1. For immediate visibility on your live site, click "Publish" and select "Publish flow now."
  2. To include it in the next full site update, click "Publish" and choose "Stage flow to publish."
  3. Click "Publish" in the Flow editor to push new changes live without updating the full site. However, future updates will not be shown on the live site until you click "Publish" so keep that in mind.
  4. For an immediate removal from your live site, click "Publish" and then select "Unpublish flow."

Renaming, duplicating, and deleting flows

Steps for Renaming, Duplicating, and Deleting Flows:

  1. Locate the flow you want to manage.
  2. Find the dropdown arrow menu positioned next to the flow name.
  3. In the dropdown menu, choose the desired action:
  1. To rename the flow, select the "Rename" option.
  2. To duplicate the flow, choose the "Duplicate" option.
  3. To delete the flow, click on the "Delete" option.

FAQ and troubleshooting tips

Here are some common questions and troubleshooting tips to help you create flows in WebFlow Logic:
General Questions:

How many action blocks or conditional rules may I utilize in a single flow?

You can incorporate up to 50 blocks in a single flow, including conditional blocks. When the limit is surpassed, an error message stating "Maximum number of 50 blocks reached" will be shown.

Does my site/workspace plan include Logic?

Logic is available independently and does not require a specific site or Workspace plan. However, certain plans may offer increased usage limits or allow for the creation of more flows.

What are the basic building blocks of a flow?

The basic building blocks of a flow are triggers, actions, and conditions. 

  1. Triggers: Events that initiate a flow (e.g., form submission, button click).
  2. Actions: Tasks performed within a flow (e.g., sending emails, making HTTP requests).
  3. Conditions: Rules that control flow execution (e.g., if a field's value equals X)

Troubleshooting Tips:

Help! I am unable to modify my flow!

If you're using a form submission trigger, ensure that you have published your site after connecting your flow to the Form or making any form-related changes. Once your site is published, clicking "Stage for publish" will change your flow during the next full site publish.

HTTP request blocks aren't working.

Structure requests correctly: Ensure proper URL, headers, and authentication.

Flow still not working after troubleshooting.

Submit a bug report: Include a screen recording and Flow ID to Webflow's Logic Bug and Feedback Form.

100+ Top-notch Webflow Templates

Take your website design to the next level with our stunning collection of Webflow templates. making them more manageable

Recommended Webflow template:

SaaSonic - SaaS Website Template

SaaSonic - SaaS Website Template

SaaSonic is a dynamic SaaS website template that caters to startups and software developers, providing a robust platform for showcasing digital products. It offers a customizable design and a user-friendly interface to ensure visitors have an optimized experience. This leads to improved site navigation and more effective brand representation.

This innovative template is more than just a design; it's a game-changer tailored specifically for SaaS companies, focusing on every detail to elevate online presence. Offering flexibility and functionality, this template empowers businesses to tailor their site to their unique needs, making it an essential tool for technology ventures. Choose SaaSonic and drive your software company's online presence to new heights.

Highlighted Features:

  1. Customizable Design
  2. User-Friendly Interface
  3. Optimized for Startups
  4. Speed Optimized
  5. Seamless Animation

Price:

Regular License: $49  

Solino - IT Company Website Template

Solino - IT Company Website Template

The Solino IT Business Website Template represents a groundbreaking option for IT enterprises, aiming to enhance their digital visibility. It is crafted to meet the needs of both emerging startups and seasoned companies. With a modern, sleek layout and retina-ready display, it ensures a professional appearance on all devices. Its fully responsive design guarantees seamless browsing, while its customizable features allow for personalization to match your brand identity. 

Crafted for the digital business environment, this Webflow template offers more than just aesthetics - it's a tool to elevate your agency's image and captivate your audience. Start your journey with Solino today and transform your online business experience.

Highlighted Features:

  1. Awesome Design
  2. Retina Ready
  3. Fully Responsive
  4. Fully Customizable

Price:

Regular License: $49

Coaxio - Business Website Template

Coaxio - Business Website Template

Coaxio is a premium business website template crafted specifically for consulting firms. Designed with precision, it meets the unique needs of professionals in the field. Its user-friendly interface caters to both firms and individual consultants, ensuring effortless navigation. 

Coaxio shines with its ease of use, responsive design, and swift loading capabilities. Compatible across various browsers, it boasts smooth scrolling animations for an enhanced user experience. Whether you're an established firm or a budding consultancy, Coaxio streamlines the process of establishing your online presence.

Highlighted Features:

  1. Ease of Use
  2. Responsive Design
  3. Speed Optimized
  4. Cross-Browser Compatible
  5. Scrolling Animations

Price:

Regular License: $79

Xova - Agency Website Template

Xova - Agency Website Template

Xova - Agency Website Template is your solution for a dynamic business presence online. Tailored for design, marketing, or digital agencies, this fully customizable template offers a sleek design and user-friendly interface. Boasting over 30 reusable sections, Xova streamlines website development for any project. 

Its responsive design ensures flawless viewing across devices, while speed optimization guarantees lightning-fast loading times. Elevate your online presence with Xova and attract clients effortlessly. This template is designed to meet the unique requirements of modern businesses, providing a professional and cutting-edge platform for your agency's success.

Highlighted Features:

  1. Responsive Design
  2. Speed Optimization
  3. Scrolling Animation
  4. Full Customizability
  5. Webflow CMS

Price:

Regular License: $49

Frequently Asked Questions

What tasks can be accomplished with WebFlow Logic?

WebFlow Logic empowers users to collect and route sales leads, engage with customers, manage site content, and more. It serves as a versatile tool for optimizing website functionality.

Why choose WebFlow Logic for user flows?

WebFlow Logic is essential for crafting user-centric experiences. It allows for the personalization of content and interactions, ensuring a seamless and logical flow for users navigating through your website.

How can I test the flows created with WebFlow Logic before publishing them live?

You can preview and test your flows within WebFlow's editor to ensure they function as intended before deploying them on your website for public access.

Can I track user interactions within the flows created using WebFlow Logic?

Yes, WebFlow Logic allows for integrating analytics tools or tracking user behavior within the flows to gather insights and optimize the user experience further.

Hire Experts to Build Your Webflow Website [Recommended- Brandbes]

Brandbes Webflow Template Design and Development Agency

Elevate your online presence by enlisting the expertise of Brandbes, a top-tier Webflow development agency. Specializing in custom premium templates, Brandbes empowers businesses to achieve digital success. 

Their adept team designs unique Webflow websites tailored to your specific requirements. With flexible development plans and an extensive template library, Brandbes guarantees a personalized approach. 

Opt for Brandbes to collaborate with a dedicated team committed to enhancing your digital footprint and ensuring enduring success. Transform your integration platform with meticulously crafted Webflow websites by partnering with Brandbes. Hire a Webflow Expert and unlock the full potential of your digital presence today.

Final Word

In conclusion, learning how to create flows using Webflow Logic can open up new doors of possibilities in web design. With Webflow Logic, you can easily create interactive animations and engaging user experiences without writing complex code. 

By following the step-by-step guide on creating flows using WebFlow logic and experimenting with the different triggers and actions, you can create unique flows tailored to your specific needs. Whether you’re a beginner or an expert, Webflow Logic can take your web design skills to the next level. So why not try it and see where your creativity can take you?

Table of contents:

See more

Webflow is a web design platform that allows you to design and create your website without coding experience. It also offers a unique tool - Webflow Logic, which will enable you to create flows that can handle complex interactions. Whether you want to trigger a popup or send an email, Webflow Logic can help you achieve it.

When creating flows, it's important to remember that you should lead the user towards your goal, whether filling out a webflow form or completing a purchase. In this blog, we'll explore the ins and outs of how to create flows using WebFlow logic to help you create stunning flows that engage and delight your audience.

100+ Top-notch Webflow Templates

Take your website design to the next level with our stunning collection of Webflow templates. making them more manageable

What is WebFlow Logic?

WebFlow Logic empowers users to build and execute automated workflows, referred to as "flows," seamlessly within the Webflow Designer. These dynamic processes enable the collection and routing of sales leads, facilitate customer connections, and effectively manage site content. 

This innovative tool centralizes diverse functionalities, providing a comprehensive solution for directly streamlining tasks such as lead management, customer engagement, and content administration within Webflow.

The importance of WebFlow Logic in creating user flows

The importance of incorporating conditional logic into user flows includes:

User Experience (UX): An easy-to-use and intuitive user experience is facilitated by logic. It guarantees that users can go around the program or website in a predictable and logical manner.

Task Completion: By creating coherent user flows, you may lead users through the procedures required to finish particular activities or actions. Due to the decreased friction, users can accomplish their objectives more easily.

Efficiency: Logical user flows contribute to the efficiency of the user interaction. Users should be able to move from one section to another with minimal confusion, reducing their time to accomplish their tasks.

Error Prevention: Well-designed user flows can help prevent errors or misunderstandings by guiding users through a process in a clear and structured way. This integration platform can reduce the likelihood of users making mistakes.

Consistency: Conditional logic in user flows ensures consistency across different sections of the website or application. Consistent interactions and navigation patterns facilitate users' development of a mental model of the system.

Engagement: Logical and well-designed user flows contribute to user engagement. Users are likelier to find what they're looking for when browsing information or features on a website or application.

Accessing Webflow Logic

Here are the step-by-step instructions to access the Webflow Logic dashboard:

  1. Open your Webflow project in the Webflow CMS Designer.
  2. In the left toolbar, look for the Logic icon. It typically appears as an icon representing logic or workflows.
  3. Click on the Logic icon. This action will open the Logic panel on your screen.
  4. Within the Logic panel, you will find various tabs. Click on the "New flow" tab.
  5. In the Flows tab, you can view high-level information about your flows. This information may include the flow name, description, Flow ID, and other relevant details.
  6. To create, manage, or test flows, use the Flow editor, which is accessible from the Flows tab.

How to Create Flows Using WebFlow Logic - An Easy Guide

WebFlow Logic allows you to design dynamic and interactive experiences on your website. Follow this simple guide on how to create flows using WebFlow logic to create flows effortlessly:

Creating a new flow

Creating flows using WebFlow Logic involves a step-by-step process:

Initiate Flow Construction:

Initiate Flow Construction

Start by creating and constructing flows, which are conditional logic sequences composed of triggers, actions, and conditions. Access the Flow editor by navigating to the Logic panel > Flows tab and selecting "New flow." This opens the Flow editor, where you can build the logic for your flows.

Configure Flow Settings:

Configure Flow Settings

Within the Flow editor, you'll find Flow settings. Provide your new flow with a name and description to clearly define its purpose and distinguish it from other flows. Additionally, note the Flow ID, which is essential for troubleshooting. In an example scenario, the flow name might be "Route contact form submissions" with a description like "Direct contact form submissions to the appropriate mailbox."

Construct the Flow:

Construct the Flow

Begin constructing your flow by selecting a trigger. Drag and drop actions and utilities onto the Flow editor canvas, connecting them to the appropriate points. These webflow integration connection points signify where blocks can be inserted, representing triggers, actions, or conditions. By carefully arranging these elements, you can design a logical sequence that guides the flow's behavior according to your specified triggers and conditions.

Constructing a flow with triggers, actions, and conditions

Step 1: Triggers

Initiate your Logic flow by incorporating a trigger, the catalyst for your automated sequence. This trigger could be an event within your website, such as form submissions, or an external occurrence signaled through a webhook. 

Select a trigger and configure its settings accordingly, providing a distinctive name for clarity. 

Note that each flow can accommodate only one trigger, and you have the flexibility to modify or remove it as needed. Examine the Trigger settings to see the output data that is shared with the flow's next blocks.

Step 2: Form Submission

If your trigger revolves around Form submission, add a form to your website. Link this Form to your flow trigger so that the flow activates when visitors submit the Form. Remember that a form can only serve as a trigger for one Logic flow. 

Navigate through the Flow editor to select the specific Form, or utilize the Designer canvas to add a Form submission trigger. 

You can easily disconnect a form from the trigger by accessing the Flow editor and navigating to the Trigger settings. Optionally, spam filtering can be implemented to sift through flow form submissions for potential spam.

Step 3: Actions

Action blocks within your Logic flow dictate the sequence of events you want to occur. These blocks can accept input data, execute logical operations, and generate output data for subsequent blocks. 

The available action blocks include sending email notifications, creating, updating, or deleting CMS items, searching for CMS items, making HTTP requests, and managing user accounts. 

Analyze the output data of these action blocks in the Block settings to understand the information shared with subsequent elements in the flow. Tailor your actions to streamline and automate your desired workflow effectively.

Testing a flow

After ensuring the right configuration and smooth execution of your flow, it's essential to conduct testing before publishing. This process also aids in identifying and resolving any potential issues within the flow. Follow these steps to test your flow:

  1. Open the Flow editor and navigate to the upper right corner.
  2. Click on "Test flow" to initiate the testing process. This action will open a modal menu window.
  3. In the modal menu, input sample data relevant to the connected trigger of your flow. For instance, if you have a Form submission trigger, fill out a sample flow form.
Testing a flow

To independently test the Make HTTP request blocks, follow either of these options:

  1. Click on the Right button on the Make HTTP request block and choose "Test this action."
  2. Select the Make HTTP request block on the canvas, then click "Run test" within Block settings. It will open a modal menu where you can input sample data for the values configured in Block settings.
  3. After entering the sample data, click "Run test" to execute a test of the specific block. These test results will be displayed in the modal menu window.
  4. Review the results and, if satisfied, click "Apply data" to integrate the test response into the rest of your flow.


Publishing a flow

The procedure for publishing your flow varies based on the trigger used to initiate it, such as flow form submission or Incoming webhook. If your flows operate independently of site interactions, you can handle their publishing separately from site publishing.

Publishing a Form Submission Flow:

Publishing a Form Submission Flow
  1. Choose the flow form that starts your flow from the Form menu in the Flow editor.
  2. To publish your flow on the next full site update, click "Publish" and then select "Stage flow for publish."
  3. Alternatively, for an immediate removal from your live site, click "Publish" and then choose "Unpublish Flow."
  4. Note: If any flows have unresolved issues, an alert modal will appear during site publishing. Resolve issues before proceeding, as unresolved flows will be disabled.

Publishing an Incoming Webhook Flow:

Flows using Incoming webhook triggers may not require site publishing. Two options for publishing Incoming webhook flows:

  1. For immediate visibility on your live site, click "Publish" and select "Publish flow now."
  2. To include it in the next full site update, click "Publish" and choose "Stage flow to publish."
  3. Click "Publish" in the Flow editor to push new changes live without updating the full site. However, future updates will not be shown on the live site until you click "Publish" so keep that in mind.
  4. For an immediate removal from your live site, click "Publish" and then select "Unpublish flow."

Renaming, duplicating, and deleting flows

Steps for Renaming, Duplicating, and Deleting Flows:

  1. Locate the flow you want to manage.
  2. Find the dropdown arrow menu positioned next to the flow name.
  3. In the dropdown menu, choose the desired action:
  1. To rename the flow, select the "Rename" option.
  2. To duplicate the flow, choose the "Duplicate" option.
  3. To delete the flow, click on the "Delete" option.

FAQ and troubleshooting tips

Here are some common questions and troubleshooting tips to help you create flows in WebFlow Logic:
General Questions:

How many action blocks or conditional rules may I utilize in a single flow?

You can incorporate up to 50 blocks in a single flow, including conditional blocks. When the limit is surpassed, an error message stating "Maximum number of 50 blocks reached" will be shown.

Does my site/workspace plan include Logic?

Logic is available independently and does not require a specific site or Workspace plan. However, certain plans may offer increased usage limits or allow for the creation of more flows.

What are the basic building blocks of a flow?

The basic building blocks of a flow are triggers, actions, and conditions. 

  1. Triggers: Events that initiate a flow (e.g., form submission, button click).
  2. Actions: Tasks performed within a flow (e.g., sending emails, making HTTP requests).
  3. Conditions: Rules that control flow execution (e.g., if a field's value equals X)

Troubleshooting Tips:

Help! I am unable to modify my flow!

If you're using a form submission trigger, ensure that you have published your site after connecting your flow to the Form or making any form-related changes. Once your site is published, clicking "Stage for publish" will change your flow during the next full site publish.

HTTP request blocks aren't working.

Structure requests correctly: Ensure proper URL, headers, and authentication.

Flow still not working after troubleshooting.

Submit a bug report: Include a screen recording and Flow ID to Webflow's Logic Bug and Feedback Form.

Recommended Webflow template:

SaaSonic - SaaS Website Template

SaaSonic - SaaS Website Template

SaaSonic is a dynamic SaaS website template that caters to startups and software developers, providing a robust platform for showcasing digital products. It offers a customizable design and a user-friendly interface to ensure visitors have an optimized experience. This leads to improved site navigation and more effective brand representation.

This innovative template is more than just a design; it's a game-changer tailored specifically for SaaS companies, focusing on every detail to elevate online presence. Offering flexibility and functionality, this template empowers businesses to tailor their site to their unique needs, making it an essential tool for technology ventures. Choose SaaSonic and drive your software company's online presence to new heights.

Highlighted Features:

  1. Customizable Design
  2. User-Friendly Interface
  3. Optimized for Startups
  4. Speed Optimized
  5. Seamless Animation

Price:

Regular License: $49  

Solino - IT Company Website Template

Solino - IT Company Website Template

The Solino IT Business Website Template represents a groundbreaking option for IT enterprises, aiming to enhance their digital visibility. It is crafted to meet the needs of both emerging startups and seasoned companies. With a modern, sleek layout and retina-ready display, it ensures a professional appearance on all devices. Its fully responsive design guarantees seamless browsing, while its customizable features allow for personalization to match your brand identity. 

Crafted for the digital business environment, this Webflow template offers more than just aesthetics - it's a tool to elevate your agency's image and captivate your audience. Start your journey with Solino today and transform your online business experience.

Highlighted Features:

  1. Awesome Design
  2. Retina Ready
  3. Fully Responsive
  4. Fully Customizable

Price:

Regular License: $49

Coaxio - Business Website Template

Coaxio - Business Website Template

Coaxio is a premium business website template crafted specifically for consulting firms. Designed with precision, it meets the unique needs of professionals in the field. Its user-friendly interface caters to both firms and individual consultants, ensuring effortless navigation. 

Coaxio shines with its ease of use, responsive design, and swift loading capabilities. Compatible across various browsers, it boasts smooth scrolling animations for an enhanced user experience. Whether you're an established firm or a budding consultancy, Coaxio streamlines the process of establishing your online presence.

Highlighted Features:

  1. Ease of Use
  2. Responsive Design
  3. Speed Optimized
  4. Cross-Browser Compatible
  5. Scrolling Animations

Price:

Regular License: $79

Xova - Agency Website Template

Xova - Agency Website Template

Xova - Agency Website Template is your solution for a dynamic business presence online. Tailored for design, marketing, or digital agencies, this fully customizable template offers a sleek design and user-friendly interface. Boasting over 30 reusable sections, Xova streamlines website development for any project. 

Its responsive design ensures flawless viewing across devices, while speed optimization guarantees lightning-fast loading times. Elevate your online presence with Xova and attract clients effortlessly. This template is designed to meet the unique requirements of modern businesses, providing a professional and cutting-edge platform for your agency's success.

Highlighted Features:

  1. Responsive Design
  2. Speed Optimization
  3. Scrolling Animation
  4. Full Customizability
  5. Webflow CMS

Price:

Regular License: $49

Frequently Asked Questions

What tasks can be accomplished with WebFlow Logic?

WebFlow Logic empowers users to collect and route sales leads, engage with customers, manage site content, and more. It serves as a versatile tool for optimizing website functionality.

Why choose WebFlow Logic for user flows?

WebFlow Logic is essential for crafting user-centric experiences. It allows for the personalization of content and interactions, ensuring a seamless and logical flow for users navigating through your website.

How can I test the flows created with WebFlow Logic before publishing them live?

You can preview and test your flows within WebFlow's editor to ensure they function as intended before deploying them on your website for public access.

Can I track user interactions within the flows created using WebFlow Logic?

Yes, WebFlow Logic allows for integrating analytics tools or tracking user behavior within the flows to gather insights and optimize the user experience further.

Hire Experts to Build Your Webflow Website [Recommended- Brandbes]

Brandbes Webflow Template Design and Development Agency

Elevate your online presence by enlisting the expertise of Brandbes, a top-tier Webflow development agency. Specializing in custom premium templates, Brandbes empowers businesses to achieve digital success. 

Their adept team designs unique Webflow websites tailored to your specific requirements. With flexible development plans and an extensive template library, Brandbes guarantees a personalized approach. 

Opt for Brandbes to collaborate with a dedicated team committed to enhancing your digital footprint and ensuring enduring success. Transform your integration platform with meticulously crafted Webflow websites by partnering with Brandbes. Hire a Webflow Expert and unlock the full potential of your digital presence today.

Final Word

In conclusion, learning how to create flows using Webflow Logic can open up new doors of possibilities in web design. With Webflow Logic, you can easily create interactive animations and engaging user experiences without writing complex code. 

By following the step-by-step guide on creating flows using WebFlow logic and experimenting with the different triggers and actions, you can create unique flows tailored to your specific needs. Whether you’re a beginner or an expert, Webflow Logic can take your web design skills to the next level. So why not try it and see where your creativity can take you?

Table of contents:

See more

Webflow is a web design platform that allows you to design and create your website without coding experience. It also offers a unique tool - Webflow Logic, which will enable you to create flows that can handle complex interactions. Whether you want to trigger a popup or send an email, Webflow Logic can help you achieve it.

When creating flows, it's important to remember that you should lead the user towards your goal, whether filling out a webflow form or completing a purchase. In this blog, we'll explore the ins and outs of how to create flows using WebFlow logic to help you create stunning flows that engage and delight your audience.

Latest Post

Top Webflow Development Companies to Elevate Your Online Presence in 2025
Webflow

Top Webflow Development Companies to Elevate Your Online Presence in 2025

Discover top Webflow development companies to elevate your online presence with stunning designs, responsive websites, and expert services for business growth

December 18, 2024
What Is Webflow Used For? Top 10 Features That Make It Stand Out
Webflow

What Is Webflow Used For? Top 10 Features That Make It Stand Out

Discover what Webflow is used for and explore its top 10 standout features that revolutionize web design and enhance user experien

November 14, 2024
Why Webflow Is Better Than WordPress for Modern Web Design: Top 10 Reasons
Webflow

Why Webflow Is Better Than WordPress for Modern Web Design: Top 10 Reasons

Webflow outshines WordPress with seamless built-in hosting, faster performance, and integrated SEO tools

November 14, 2024