Due to the EID vacation, our team will be out of the office from April 5th to 14th. During this time, our support response times may be slightly delayed, but some of our support heroes will do their best to assist. Rest assured, we'll be back to full speed on April 15th.

Table of contents:

See more

Adding a Webflow countdown timer can be an effective way to add urgency to your website. It can help persuade visitors to take action before the timer runs out! In this blog post, we will show you how to add Webflow countdown timer. We will also provide some tips on how to use it effectively.

Benefits of Adding Countdown Timer to Your Website

If you want to add a Webflow countdown timer to your website, it can provide several benefits, including:

Increased urgency

A countdown timer creates a sense of urgency for visitors, encouraging them to take action before time runs out. It can be particularly effective for limited-time offers, sales, or events.

Improved conversions

By adding urgency, a countdown timer can improve your add countdown’s conversion rates, driving more visitors to take the desired action, such as purchasing or signing up for a newsletter.

Enhanced user experience

A countdown timer can also enhance the user experience by creating a sense of anticipation and excitement. It can be particularly effective for upcoming product launches or events.

Increased engagement

A countdown timer can encourage visitors to stay longer on the countdown, keeping them engaged and interested in your content.

Clear communication

Add a Webflow countdown timer to communicate important information, such as when a sale ends or when a product will be available for purchase. It can help prevent confusion and ensure visitors have all the information they need.

How to Add a Webflow Countdown Timer on Your Website

If you’re looking to add excitement to your website, a countdown timer is a great way to build anticipation for an upcoming event, product launch, or sale. With Webflow CMS, adding a countdown timer to your website is easier than you might think. Just follow these steps –

Add Custom Code to Your Page

First, you’ll need to add a custom code to your page. Simply navigate to your project or page settings area and paste the code into the designated area. The code references days, hours, minutes, and seconds with #IDs, so you can customize your countdown clock to fit your needs.
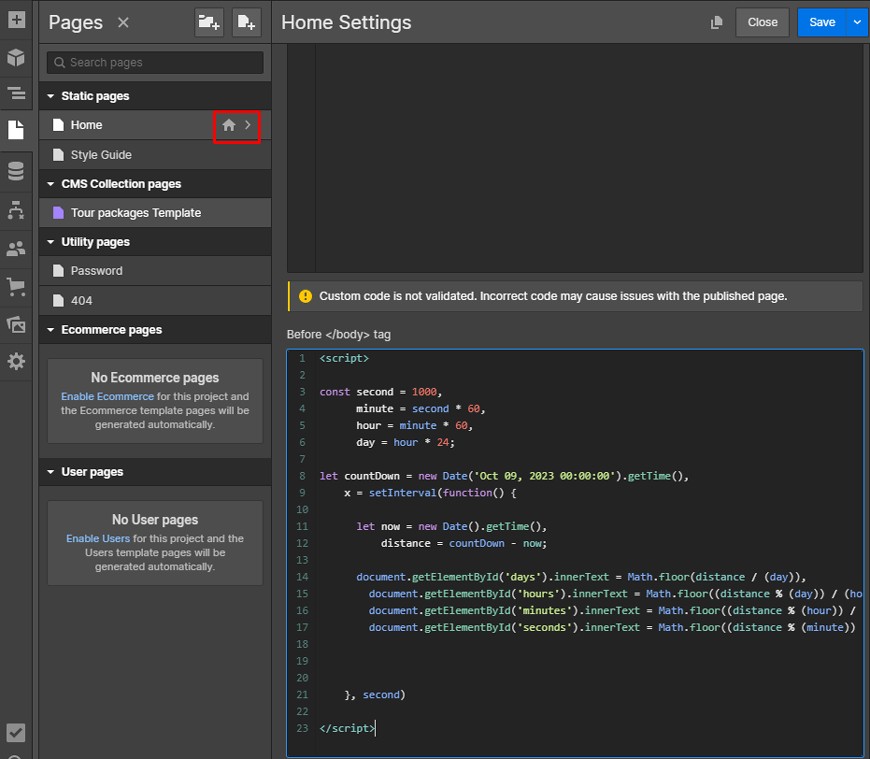
Add Custom Code to Your Page

Add Text Elements to Display the Days, Hours, etc

Next, add text elements to your page to display the days, hours, minutes, and seconds until your event or launch. Again, you can customize the appearance and location of these elements to match your Webflow website’s design. Whether you’re counting down to a sale, a webinar, or a new product release, a Webflow countdown timer is a powerful way to engage your audience and drive conversions.
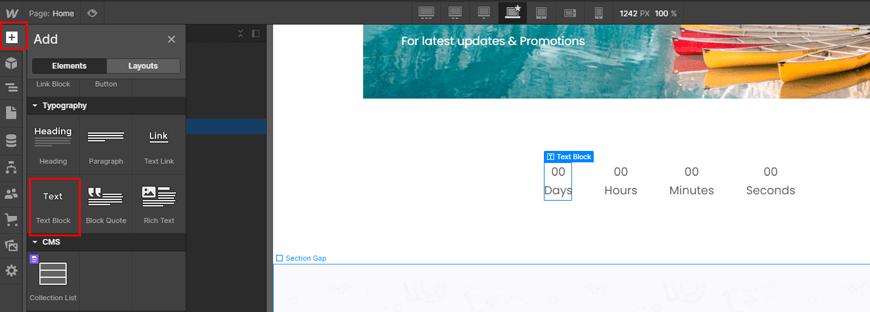
Add Text Elements
Add Text Elements to Display the Days, Hours, etc

Add #ID for Days, Hours, Minutes, Seconds

Another important step is to add #IDs for days, hours, minutes, and seconds, depending on the type of countdown element you need. Simply select your text element and navigate to the settings panel to add the corresponding #ID. Once you have your #IDs in place, you’ll be well on your way to creating an engaging and dynamic add countdown that your audience will love.
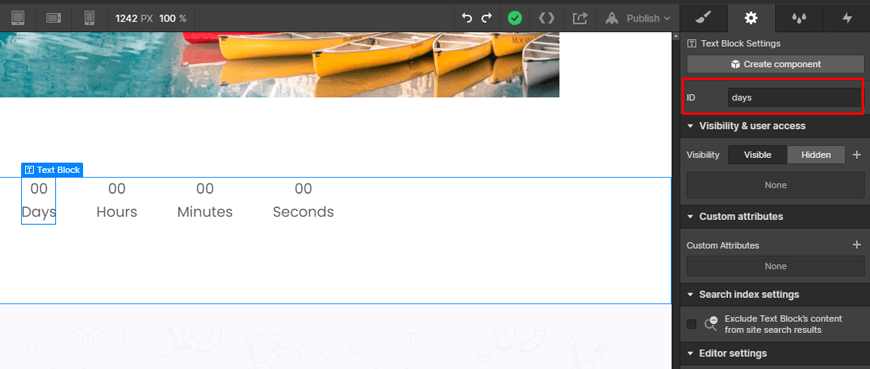
Add ID for Days, Hours, Minutes, Seconds

Test and Publish

After creating your timer in Webflow, you only need to publish and test it to ensure it works as intended. Then, with just a few clicks, you can have a professional-looking countdown timer Webflow that will impress your website’s visitors.

Test and Publish
Test and Publish

30+ Top-notch Webflow Templates

Take your website design to the next level with our stunning collection of Webflow templates.

Tips for Using a Webflow Countdown Timer Effectively

Sure, here’s a more detailed explanation of each of the tips for using a Webflow countdown timer effectively:

Set Realistic Time Frames

Make sure the countdown timer’s deadline is attainable and realistic. Setting a realistic time frame is one of the most crucial components of using a countdown timer. A short or improbable time limit may irritate and lack faith in the Webflow website.

If, for instance, the timer is set for 10 seconds, but the user requires more time to act, they can get impatient and leave the website. On the other hand, the user might not act at all if the time limit is too long, as it may fail to engender a sense of urgency. Consequently, it’s crucial to pick a deadline that is both acceptable and feasible.

Use Positive Language

Use positive language, such as “Don’t miss out on this amazing opportunity, act now,” instead of negative language, like “Hurry up, time is running out.” Upbeat wording can generate excitement and suspense, enticing users to act before the timer expires.

Make it Visible and Easy to Read

The website’s countdown timer should be prominently displayed so that users can see it. The timer should be easy to see and clearly visible compared to the rest of the page’s content. Users will be motivated to act quickly due to the sense of urgency created by this.

Highlight the Benefits of Taking Action Before the Timer Runs Out

Point out the advantages of acting quickly before the countdown expires. It’s crucial to emphasize the advantages of acting quickly before the timer expires in addition to utilizing positive language.

For instance, if a deal is about to end, emphasize the discounts or the products’ short supply. This will motivate consumers to act quickly so they may reap the rewards and avoid missing out.

Use it Sparingly & Strategically

Despite the fact that countdown timers might be useful, it’s crucial to use them carefully and selectively. A timer can lose its significance and frustrate customers if it is used too often or for unimportant purposes.

As a result, it’s crucial only to utilize the timer when essential and to position it carefully on the page. In order for users to take the timer seriously, make sure it is only utilized for significant events or promotions.

Conclusion

In conclusion, the Webflow Countdown timer is a fantastic tool for those looking to add a little excitement and urgency to their Webflow website. With its customizable options and user-friendly interface, designing the perfect countdown has never been easier.

Whether you are launching a new product, promoting a sale, or simply adding some visual interest to your website, the Webflow Countdown Timer is an excellent choice.

30+ Top-notch Webflow Templates

Take your website design to the next level with our stunning collection of Webflow templates.

Table of content:

See more

Adding a Webflow countdown timer can be an effective way to add urgency to your website. It can help persuade visitors to take action before the timer runs out! In this blog post, we will show you how to add Webflow countdown timer. We will also provide some tips on how to use it effectively.

Benefits of Adding Countdown Timer to Your Website

If you want to add a Webflow countdown timer to your website, it can provide several benefits, including:

Increased urgency

A countdown timer creates a sense of urgency for visitors, encouraging them to take action before time runs out. It can be particularly effective for limited-time offers, sales, or events.

Improved conversions

By adding urgency, a countdown timer can improve your add countdown’s conversion rates, driving more visitors to take the desired action, such as purchasing or signing up for a newsletter.

Enhanced user experience

A countdown timer can also enhance the user experience by creating a sense of anticipation and excitement. It can be particularly effective for upcoming product launches or events.

Increased engagement

A countdown timer can encourage visitors to stay longer on the countdown, keeping them engaged and interested in your content.

Clear communication

Add a Webflow countdown timer to communicate important information, such as when a sale ends or when a product will be available for purchase. It can help prevent confusion and ensure visitors have all the information they need.

How to Add a Webflow Countdown Timer on Your Website

If you’re looking to add excitement to your website, a countdown timer is a great way to build anticipation for an upcoming event, product launch, or sale. With Webflow CMS, adding a countdown timer to your website is easier than you might think. Just follow these steps –

Add Custom Code to Your Page

First, you’ll need to add a custom code to your page. Simply navigate to your project or page settings area and paste the code into the designated area. The code references days, hours, minutes, and seconds with #IDs, so you can customize your countdown clock to fit your needs.

Add Custom Code to Your Page

Add Text Elements to Display the Days, Hours, etc

Next, add text elements to your page to display the days, hours, minutes, and seconds until your event or launch. Again, you can customize the appearance and location of these elements to match your Webflow website’s design. Whether you’re counting down to a sale, a webinar, or a new product release, a Webflow countdown timer is a powerful way to engage your audience and drive conversions.

Add Text Elements
Add Text Elements to Display the Days, Hours, etc

Add #ID for Days, Hours, Minutes, Seconds

Another important step is to add #IDs for days, hours, minutes, and seconds, depending on the type of countdown element you need. Simply select your text element and navigate to the settings panel to add the corresponding #ID. Once you have your #IDs in place, you’ll be well on your way to creating an engaging and dynamic add countdown that your audience will love.

Add ID for Days, Hours, Minutes, Seconds

Test and Publish

After creating your timer in Webflow, you only need to publish and test it to ensure it works as intended. Then, with just a few clicks, you can have a professional-looking countdown timer Webflow that will impress your website’s visitors.

Test and Publish
Test and Publish

30+ Top-notch Webflow Templates

Take your website design to the next level with our stunning collection of Webflow templates.

Tips for Using a Webflow Countdown Timer Effectively

Sure, here’s a more detailed explanation of each of the tips for using a Webflow countdown timer effectively:

Set Realistic Time Frames

Make sure the countdown timer’s deadline is attainable and realistic. Setting a realistic time frame is one of the most crucial components of using a countdown timer. A short or improbable time limit may irritate and lack faith in the Webflow website.

If, for instance, the timer is set for 10 seconds, but the user requires more time to act, they can get impatient and leave the website. On the other hand, the user might not act at all if the time limit is too long, as it may fail to engender a sense of urgency. Consequently, it’s crucial to pick a deadline that is both acceptable and feasible.

Use Positive Language

Use positive language, such as “Don’t miss out on this amazing opportunity, act now,” instead of negative language, like “Hurry up, time is running out.” Upbeat wording can generate excitement and suspense, enticing users to act before the timer expires.

Make it Visible and Easy to Read

The website’s countdown timer should be prominently displayed so that users can see it. The timer should be easy to see and clearly visible compared to the rest of the page’s content. Users will be motivated to act quickly due to the sense of urgency created by this.

Highlight the Benefits of Taking Action Before the Timer Runs Out

Point out the advantages of acting quickly before the countdown expires. It’s crucial to emphasize the advantages of acting quickly before the timer expires in addition to utilizing positive language.

For instance, if a deal is about to end, emphasize the discounts or the products’ short supply. This will motivate consumers to act quickly so they may reap the rewards and avoid missing out.

Use it Sparingly & Strategically

Despite the fact that countdown timers might be useful, it’s crucial to use them carefully and selectively. A timer can lose its significance and frustrate customers if it is used too often or for unimportant purposes.

As a result, it’s crucial only to utilize the timer when essential and to position it carefully on the page. In order for users to take the timer seriously, make sure it is only utilized for significant events or promotions.

Conclusion

In conclusion, the Webflow Countdown timer is a fantastic tool for those looking to add a little excitement and urgency to their Webflow website. With its customizable options and user-friendly interface, designing the perfect countdown has never been easier.

Whether you are launching a new product, promoting a sale, or simply adding some visual interest to your website, the Webflow Countdown Timer is an excellent choice.

Table of contents:-

See more

Adding a Webflow countdown timer can be an effective way to add urgency to your website. It can help persuade visitors to take action before the timer runs out! In this blog post, we will show you how to add Webflow countdown timer. We will also provide some tips on how to use it effectively.

Benefits of Adding Countdown Timer to Your Website

If you want to add a Webflow countdown timer to your website, it can provide several benefits, including:

Increased urgency

A countdown timer creates a sense of urgency for visitors, encouraging them to take action before time runs out. It can be particularly effective for limited-time offers, sales, or events.

Improved conversions

By adding urgency, a countdown timer can improve your add countdown’s conversion rates, driving more visitors to take the desired action, such as purchasing or signing up for a newsletter.

Enhanced user experience

A countdown timer can also enhance the user experience by creating a sense of anticipation and excitement. It can be particularly effective for upcoming product launches or events.

Increased engagement

A countdown timer can encourage visitors to stay longer on the countdown, keeping them engaged and interested in your content.

Clear communication

Add a Webflow countdown timer to communicate important information, such as when a sale ends or when a product will be available for purchase. It can help prevent confusion and ensure visitors have all the information they need.

How to Add a Webflow Countdown Timer on Your Website

If you’re looking to add excitement to your website, a countdown timer is a great way to build anticipation for an upcoming event, product launch, or sale. With Webflow CMS, adding a countdown timer to your website is easier than you might think. Just follow these steps –

Add Custom Code to Your Page

First, you’ll need to add a custom code to your page. Simply navigate to your project or page settings area and paste the code into the designated area. The code references days, hours, minutes, and seconds with #IDs, so you can customize your countdown clock to fit your needs.

Add Custom Code to Your Page

Add Text Elements to Display the Days, Hours, etc

Next, add text elements to your page to display the days, hours, minutes, and seconds until your event or launch. Again, you can customize the appearance and location of these elements to match your Webflow website’s design. Whether you’re counting down to a sale, a webinar, or a new product release, a Webflow countdown timer is a powerful way to engage your audience and drive conversions.

Add Text Elements
Add Text Elements to Display the Days, Hours, etc

Add #ID for Days, Hours, Minutes, Seconds

Another important step is to add #IDs for days, hours, minutes, and seconds, depending on the type of countdown element you need. Simply select your text element and navigate to the settings panel to add the corresponding #ID. Once you have your #IDs in place, you’ll be well on your way to creating an engaging and dynamic add countdown that your audience will love.

Add ID for Days, Hours, Minutes, Seconds

Test and Publish

After creating your timer in Webflow, you only need to publish and test it to ensure it works as intended. Then, with just a few clicks, you can have a professional-looking countdown timer Webflow that will impress your website’s visitors.

Test and Publish
Test and Publish

Arrow Image