
If you’re looking for a way to add interactivity to your website, you should consider using modals. Modals are pop-up windows that allow the user to perform an action, such as submitting a form or clicking a button. In this blog post, we will show you how to create a modal in Webflow. We will also provide tips on making your Webflow modal windows more user-friendly. Let’s get started!
Overview of Webflow Modal

Modals, a popular design pattern, can be easily created in Webflow. Instead of fumbling around with complex code, you can use simple interactions to quickly and effectively deploy your modal view. The Webflow modal pop-up helps give visitors a clearer overview or insight into the topic or person without cluttering the main page with all of the extra details.
Whether introducing an individual or wanting to highlight an event/product, adding an image caption, an image video, or modals to your Webflow website can enhance your users’ visit and make them more aware of what you have to offer. With simple Webflow interactions, adding these modal windows has never been easier!
Setting up a Modal in Webflow
Step 1: Include a pop-up modal wrapper.
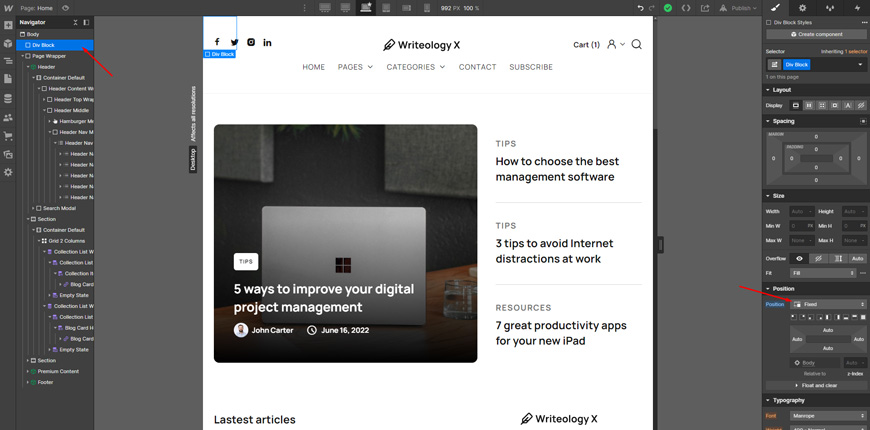
In order to set up a modal in Webflow, you must begin by including a pop-up modal wrapper. To do so, you’ll need to drag Div Block in Body section that will serve as the container for your Modal. After doing this, be sure to “Fixed” place from the position it at the top of your site’s body using the Navigator pane. Otherwise, it will likely not work properly.
Step 2: Design a pop-up modal wrapper
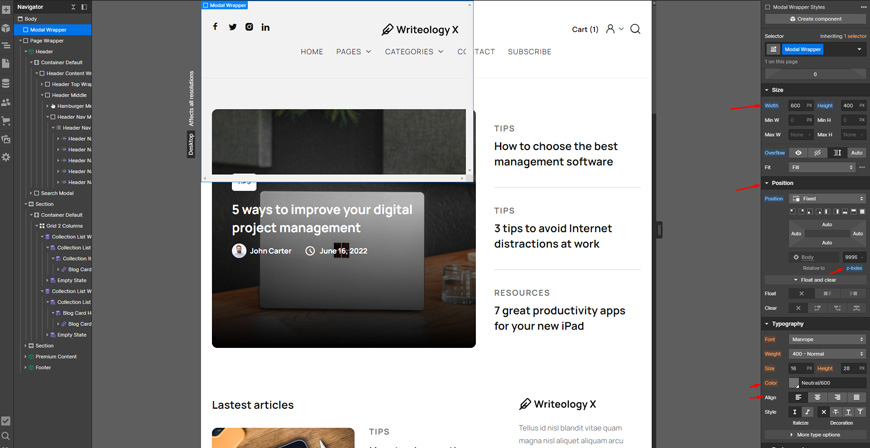
Now you’ll have to give the Div Block a class so we can style it after we’ve added it to the top of our page. Thus, you can adjust the settings for each of our desired attributes. For instance, you can set top padding, height, position, Z-index, text-align and the background color.
Step 3: Include your signup wrapper.
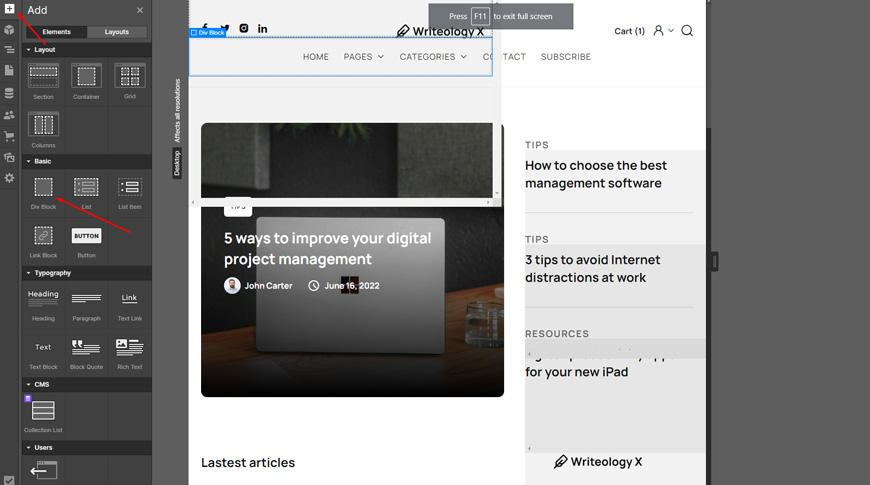
After you have created your Modal Wrapper, it’s time to add the content of your Modal. First, we’ll drag-and-drop a Div Block inside the Modal wrapper to give you an additional layer to work with. This will be our content wrapper and house all the elements needed for a successful signup form, from text fields to checkboxes to buttons. Once this block is in place, you can start sprucing up our form design. So it’s ready for visitors to complete.
Step 4: Style a signup wrapper.
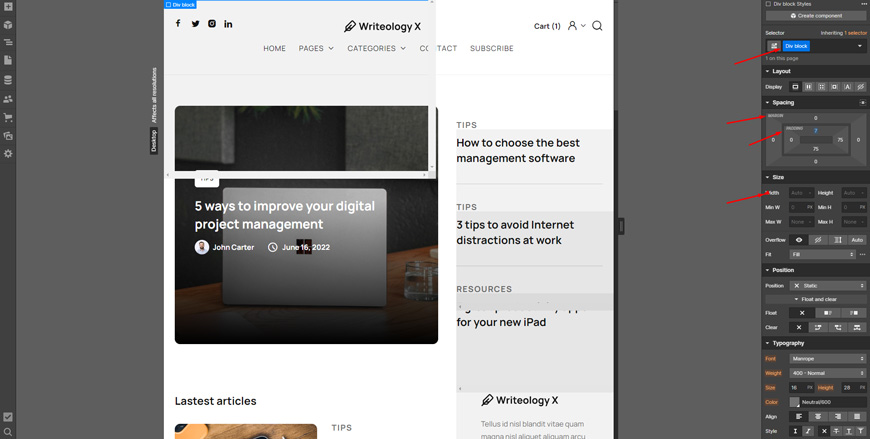
The Signup Wrapper provides a necessary space for the signup form. Applying our specified class name, padding values, margin, width and max-width will ensure it positions correctly within the modal wrapper and looks aesthetically pleasing. Then, you need to define its style with padding, margin, width, and max-width and add background color so it fits perfectly with the rest of your site. All these together will ensure that new users have the best possible experience when they visit your website.
Step 5: Fill up the Modal’s content
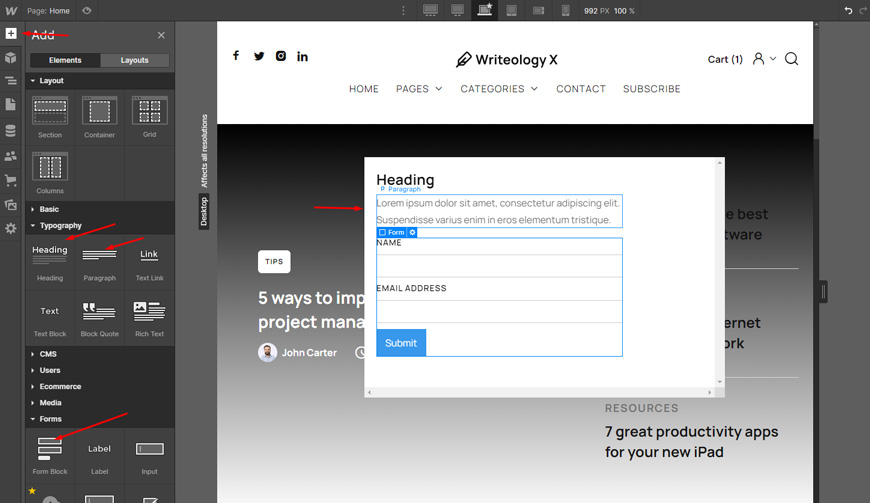
Adding content to the modal window is the next step in creating a more comprehensive web page filling up the content of the Modal can be done quickly and easily with a few simple steps. Firstly, select a Heading (H3) element, some paragraph text, and add a Form element. The form element is then customizable according to your needs; whether it is reducing the form element to add custom fields or creating separate classes around the elements. Adding this content will bring our Modal to life, making it more interactive and visually appealing than ever before.
Step 6: Include a close link.
Adding a close link to our Modal allows visitors to quickly and easily opt out of signing up for our service. After adding alt text to the top of the Signup Wrapper and giving it the class name Close Link, you can apply specific style parameters to ensure our close Link looks uniform with the rest of the Modal. In addition, you can make sure that visitors have a simple exit if they decide they no longer want to be presented with the offer by going the extra mile.
Step 7: Include a modal wrapper interaction.
After adding all of the other necessary elements, step seven calls for an interaction on the Modal Wrapper. This includes setting up its initial appearance by altering its scale, opacity, and display. The scale is set to 1.10, the opacity to 0%, and the display to none, so it properly functions when clicked. Finally, these interactions enable us to make sure our users get access to all the options available with a seamless flow.
Step 8: Make the subscribe button interactive.
In this step, we’ll add an interaction to the Subscribe button that will open up the Modal wrapper when clicked. It’s as easy as selecting the Subscribe button, creating a new interaction, and setting up the Click Trigger. Finally, type “Modal Wrapper” into the appropriate text field and you will have finished implementing this interact. You can make your website more engaging and dynamic with a few clicks while improving user experience.
Step 9: Make the close Link interactive.
Adding an interaction to the Close Link is the last step in creating a functioning modal. To do this, you will have to double-click on the Link and select ‘+ Add Interaction’. Finally, applying a Hover State to you can easily affect the Modal Wrapper element. This will create an action such as closing or hiding the Modal after its contents have been interacted with.
The fully functional Webflow Modal is complete with all of these modal window elements in their respective locations and interactions in place!
Some Remarkable Webflow Templates You May Like
Looking for some remarkable Webflow templates? Look no further! There are numerous magnificent options out there that cater to the different needs of web designers and developers. Such as —
Villar – Real Estate Website Template

The Villar – Real Estate Webflow Website Template is an ideal resource for creating a stylish and professional-looking website with smooth web navigation. Thanks to its optimizations and customization, pages load incredibly quickly and intuitively adapt their layout to any size monitor, allowing visitors to enjoy a seamless browsing experience.
Whether you want to create a easy-to-use real estate company or agent site, this template facilitates it all – enabling the listing of properties in a manner that’s efficient and customer friendly. Thus, this choice can ensure that an outstanding website supports your property management business.
Highlighted Features:
- Optimized for fast loading speed
- SEO Friendly
- Great Customizability
- Retina Ready
- Responsive Layout
Price: Regular License: $49
Resideo – Real Estate Website Template
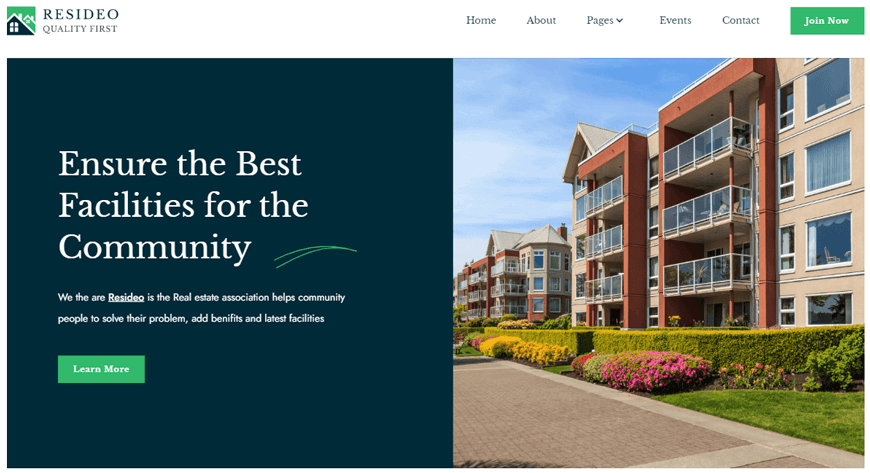
Resideo is the perfect Home Owners Association Webflow HTML Website Template for those HOAs wanting to get their message out there. With over 22 different pages available, this template covers all the bases. From an About page to a Contact page and even an Events page that lists any Association events that may be coming up – it’s all here!
For added convenience, Resideo also offers 5 CMS template pages, authors, team members, blog posts, and projects – making it easier than ever to create a truly professional website for any Homeowners Association.
Highlighted Features:
- 15 static pages
- Fast Loading Speed
- 5 CMS pages,
- SEO Friendliness
- Responsive Layout
Price: Regular License: $49
Prouple – App Website Template

Prouple is the perfect Webflow template to give your next web project the polished and professional edge it needs. This cryptocurrency-focused site offers 17 total pages crammed with key features, so it’s easy to see why it’s quickly become a preferred choice for businesses looking for online success.
Not only does Prouple provide static, CMS collection, service, utility, and blog pages — as well as timelessly effective design elements — but its responsiveness and SEO friendliness give website owners an extra layer of smartness. Take your business from good to great with Prouple!
Highlighted Features:
- 17 web pages
- Fast Loading Speed
- Media Lightbox
- Retina Ready
- Responsive Layout
Price: Regular License: $49
StoryX – News Website Template

StoryX is the perfect solution for anyone looking to create an amazing blog without any hassle. Not only is it highly customizable, allowing users to make their blog look distinct and unique, but with its fast loading speed and SEO friendly design, your website will always remain at the cutting edge of technology. What’s more, StoryX is also optimized for all devices – desktops and smartphones alike.
So no matter where your readers are accessing from, they will get a smooth user experience. Additionally, thanks to regular updates, StoryX offers a plethora of innovative designs and features with each new update. Get on board today and build the blog of your dreams!
Highlighted Features:
- Optimized for fast loading speed
- SEO Friendly
- Customizability at its best
- Fully Responsive and Adaptive Layout
- Regular Updates
Price: Regular License: $49
Funder – Agency Website Template

The Funder Webflow template is designed to offer maximum impact and flexibility to businesses of all sizes, ranging from small startups to established professionals. In addition to the 16 web page templates available, many of which are tailored specifically to services, companies and products, there are also multiple options for more intricate presentations, such as blog pages and style guides.
Once chosen, each page can be easily personalized with a color palette, design accents, and navigation tools. Put simply, Funder is the perfect choice for any business wanting to get noticed online – it is simple enough for novices yet powerful enough for industry veterans.
Highlighted Features:
- 16 web pages
- SEO Friendly
- Great Customizability
- Retina Ready
- 5 CMS Pages
Price: Regular License: $49
Tips for Making Your Modals More User-Friendly
Creating user-friendly Webflow modals can be challenging, but with a few simple tips and techniques, you can dramatically improve how users interact with them. Here are a few tips you should consider —
- Start with a unique modal title.
- Incorporate explanation graphics
- Improve your body copy.
- Include a clear call to action
- Make sure users are aware of their obligations.
- In a modal window, give content and functional components priority.
Wrapping Up – How to Create a Modal in Webflow
Setting up a modal in WebFlow has never been easier! Take the stress out of figuring out how to do it by Learning how to create and customize them. From there, you can start adding interactivity and animations without writing any code whatsoever.
With its intuitive drag-and-drop platform and visual interface, you will be cranking out interactive Webflow modals in no time. Enjoy having more control over your design strategy, website flow, and page layout all within the same codebase.


